How to Localscape your Yard
We talk a lot about supporting local businesses, but have you ever thought about localscaping your yard? Neither did we until we watched a Livestream about Localscaping from the USU Center of Water Efficient Landscaping Facebook. We recommend that you watch their introduction to Localscapes as well, but you can see our main takeaways and opinions in the article below.
What is Localscaping?
Localscaping is landscaping to match plants and styles that align with your local area and climate. For example, if you are landscaping in Oregon, you don’t necessarily need dessert plants due to all of the moisture. In contrast, landscaping in Utah, the same landscape design would need to much water, and you would be spending an excessive amount of money to maintain them. The goal of localscaping is to landscape a yard that is functional for your needs, easy to maintain, and conserves water regardless of where you live.
Although the concept started by the LocalScapes organization, which is Utah based, the ideas and processes can help you design your landscape wherever you are.
In this article, we will start with the steps on how to localscape your yard, tell you our experience with local scaping, and provide extra resources and videos at the end of the article.
How to Localscape Your Yard
- Create a Landscape Design
- Write a plan
- Act on your plan
- Evaluate as you go
Step 1: Create a Landscape Design
I thought I knew what I wanted my yard to look like after looking at Pinterest for ideas (check out our landscape design board), but I don’t think I would have taken the time to draw it out if it weren’t for this video. Drawing it out made me realize flaws in my vision that I would never have noticed if I had not planned out the whole yard. Not being a professional landscaper, the video suggested the following five areas when starting to create a custom landscape design.
5 Areas to Look at when Landscaping
- Central Open Shape
- Gathering Areas
- Activity Areas
- Paths
- Place flower beds to fill empty space
Following that order, along with the additional information in the video made, making a rough outline of the yard easier then I could imagine. It helped me design a yard I would never have come up with on my own. The best part was the yard not only was going to be a lot more aesthetically pleasing, but functional for how my family would be using it.
The outline came to life as I took measurements and to turn my rough draft into a scalable landscape design. Check out this article for more details on how to create a landscape design.
Once I finished the landscape design, I realized that all though I had a good vision of where I wanted to take my yard, I didn’t know how or how long it would take to get there.
Step 2: Write a plan
As much as I wish I could take a weekend and get it all done at once, it isn’t a very realistic idea due to time constraints and limited money. I imagine you are probably in a similar situation.
Once I had the landscape design created, I realized I didn’t know how to build a patio and would probably need to contract that out. I also realized I didn’t have the funds or time and would need to do the whole yard in one go. I realized I would need to work with my wife to figure out flowers she would want in the yard as well as what outdoor furniture to buy when we finish the patio.
Luckily we have spent hours writing The Honey Do List Solutions blog and trying to perfect our honey-do list. We started adding projects and tasks to our honey-do list board on Trello. Our Honey Do List helped us take the massive landscaping project and turn it into several small actionable items. You can use whatever honey-do list or project management tool you use in your family. If you don’t have one already, check out these honey-do lists examples.
When breaking out the tasks don’t forget to add tasks such as
- call contractor to get a quote
- research how to build a garden box
- decide on what flowers we want to have
- go to the store and get “x” supplies
Step 3: Act on your plan
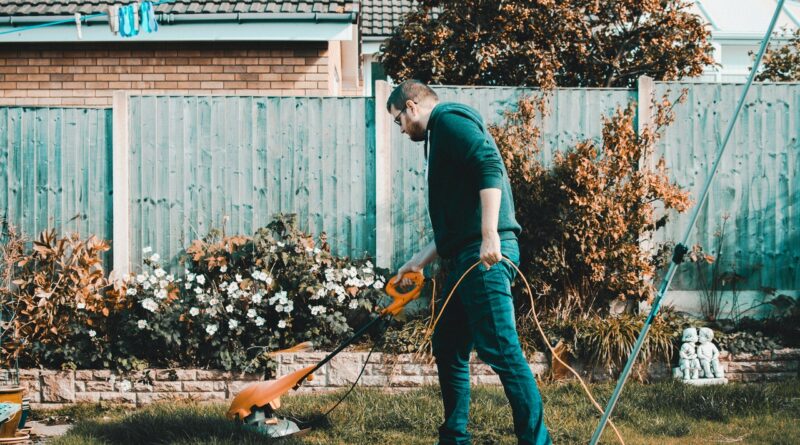
Although not the most exciting if you don’t like yard work, this is the most straightforward part if you have a very detailed plan. It is simply doing what is on your plan. That said, we know yard work is time-consuming and takes time; that is why breaking the project into smaller projects is essential. It is also important to decide what task you will do yourself and which ones you will outsource. If you are needing a local service professional or have one to recommend, please check out our Honey Do List Network, a directory dedicated to supporting local businesses.
Step 4: Evaluate as you go
As you go, you may run into problems, or have new ideas, and that is okay. Just because you decide to change something doesn’t mean it is a bad thing. That or, in our case, thinking a swing set would fit then realizing it wouldn’t. The only time it is bad is if you have to destroy something, you just spent hours changing. You should design your landscape to at least last for 3-5 years, if not longer.
That said, your landscape is like the joy of homeownership, and maintaining your designed landscape will never end. As time goes on, things will change, and you may decide to redesign certain parts again later down the road.
How the Localscape Process saved us Time and Money
After watching the Localscape Webinar, I was excited to apply what I learned. We recently moved into our home, and the backyard needed some help. (a lot of help)
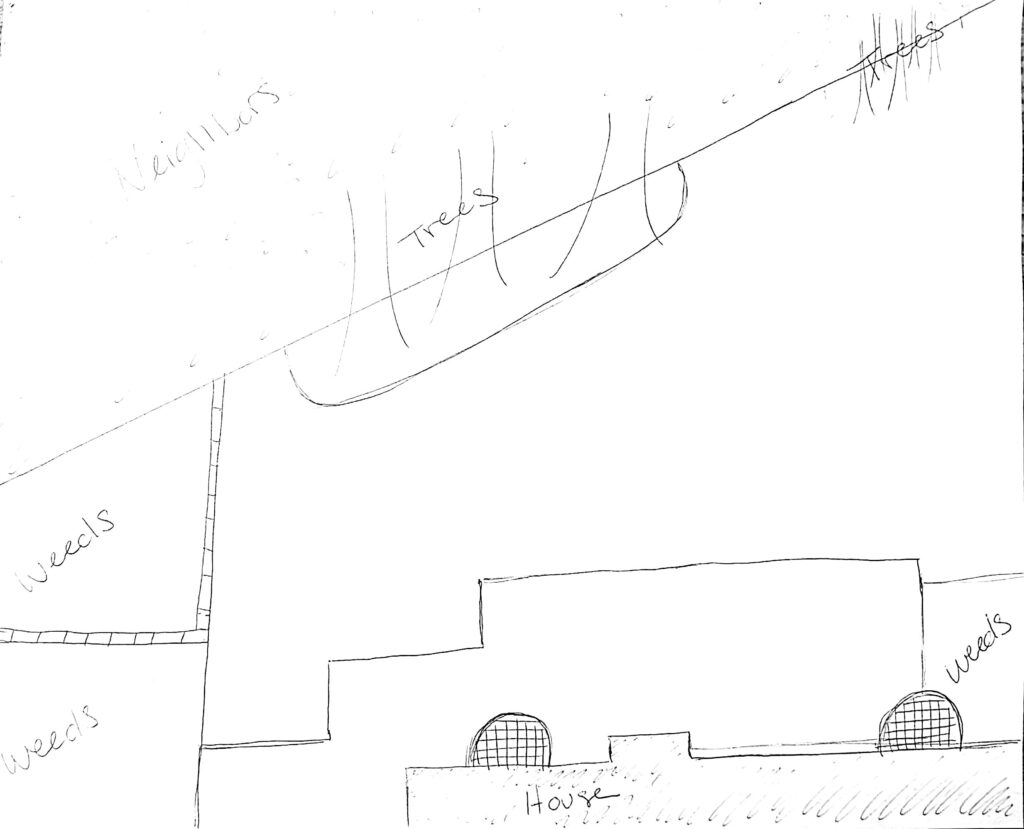
At first, it had what was once a beautiful garden area that was overgrown with weeds. When we first moved in, the plan was to turn into back into a garden. After watching the local scopes video, I realized it would be a better play area. Putting in bark would be a lot easier to maintain as we didn’t want or need that big of a garden.
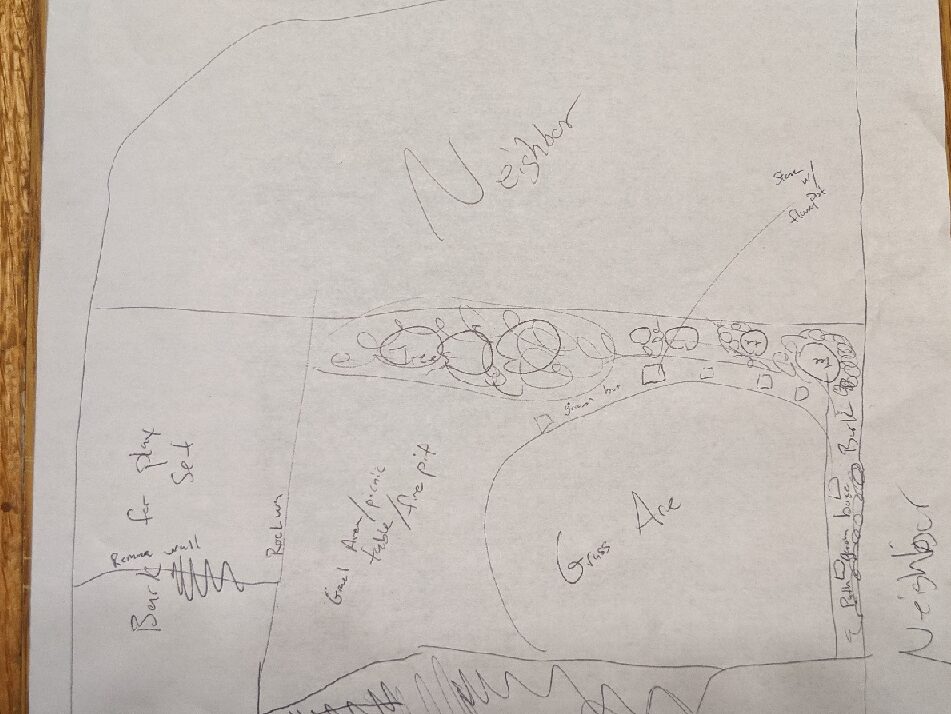
Luckily things came up, and I was not able to get to the project and realized a few things. First, I had not considered how and where I was going to connect the drip hose I envisioned to water the garden beds. Second, I realized my images were not to scale, and I didn’t know how much space each area took up. I also had changed my mind about certain aspects as well. That is where Marina and I took the time and came up with this sketch with our yard and included measurements.
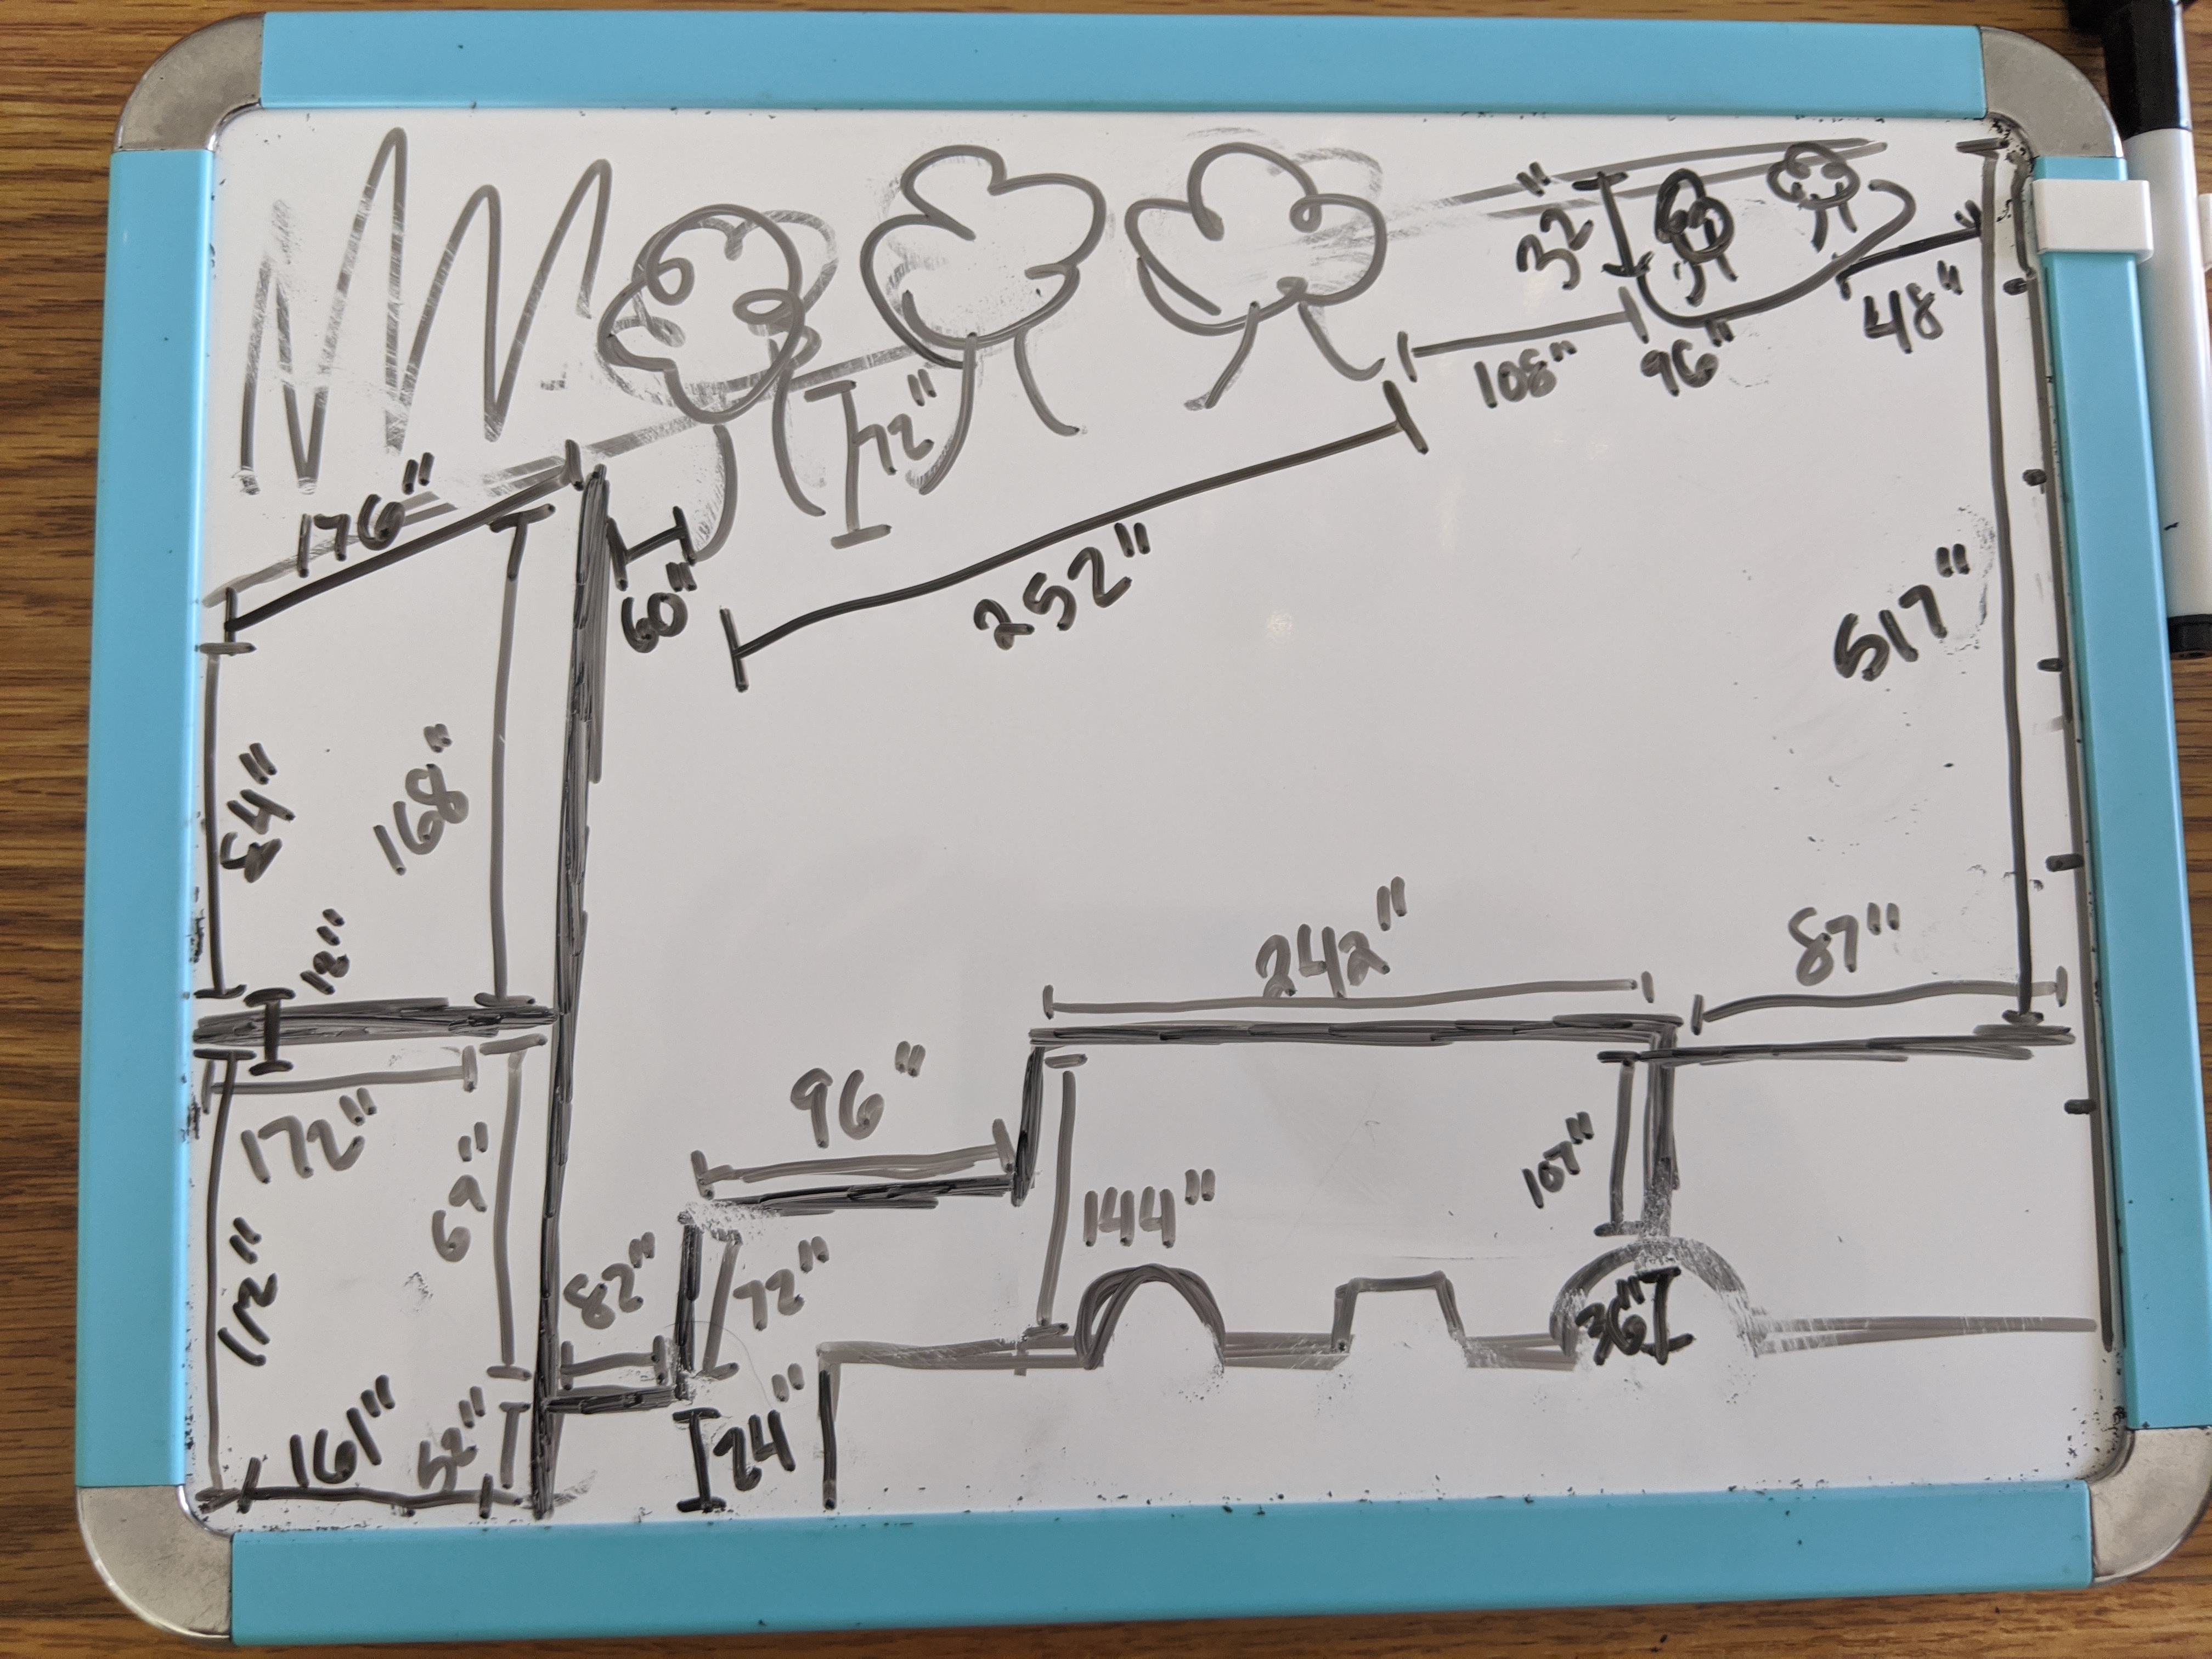
We then took that version and applied it to our new designs. As we went through we, found it necessary to look at things we might buy to put in the backyard to make sure it wasn’t too crowded, and everything would fit. Below you will see a current sketich of our yard as well as the Localscape Design.
Current Sketch
Localscape Design

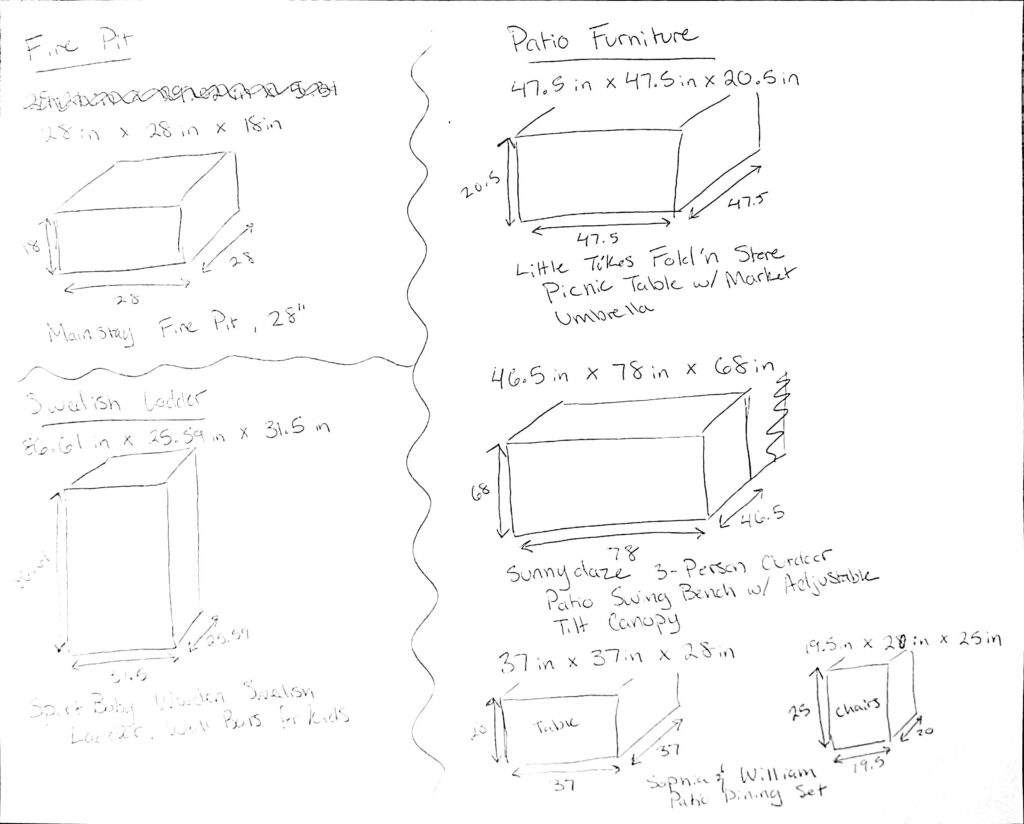
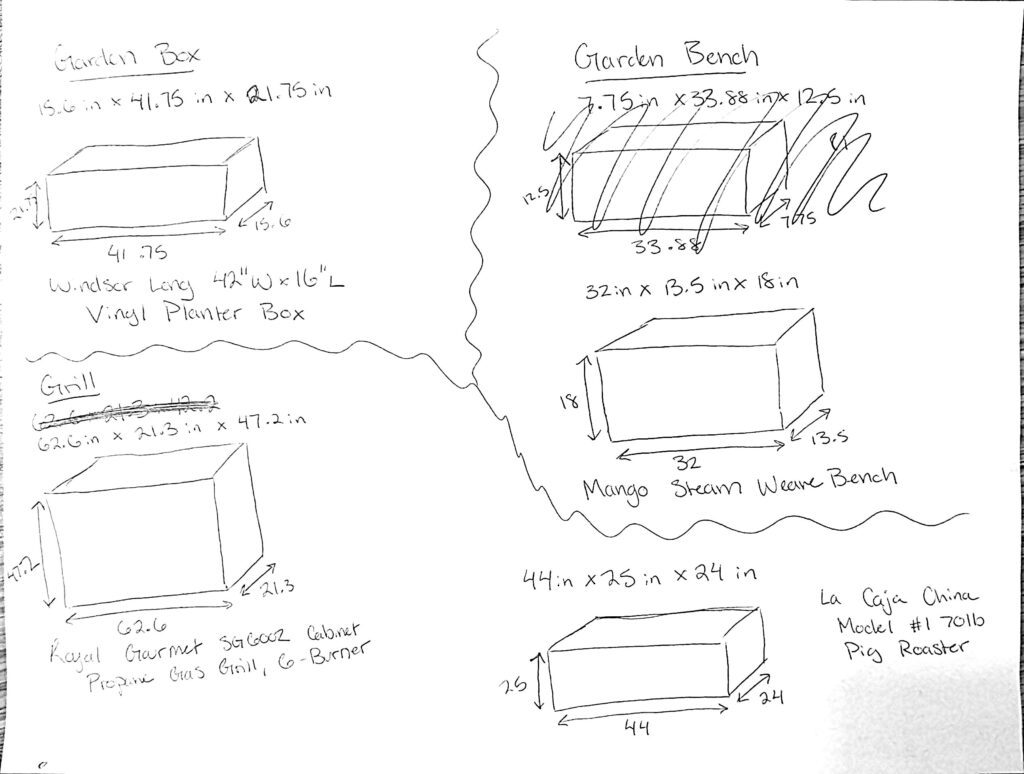
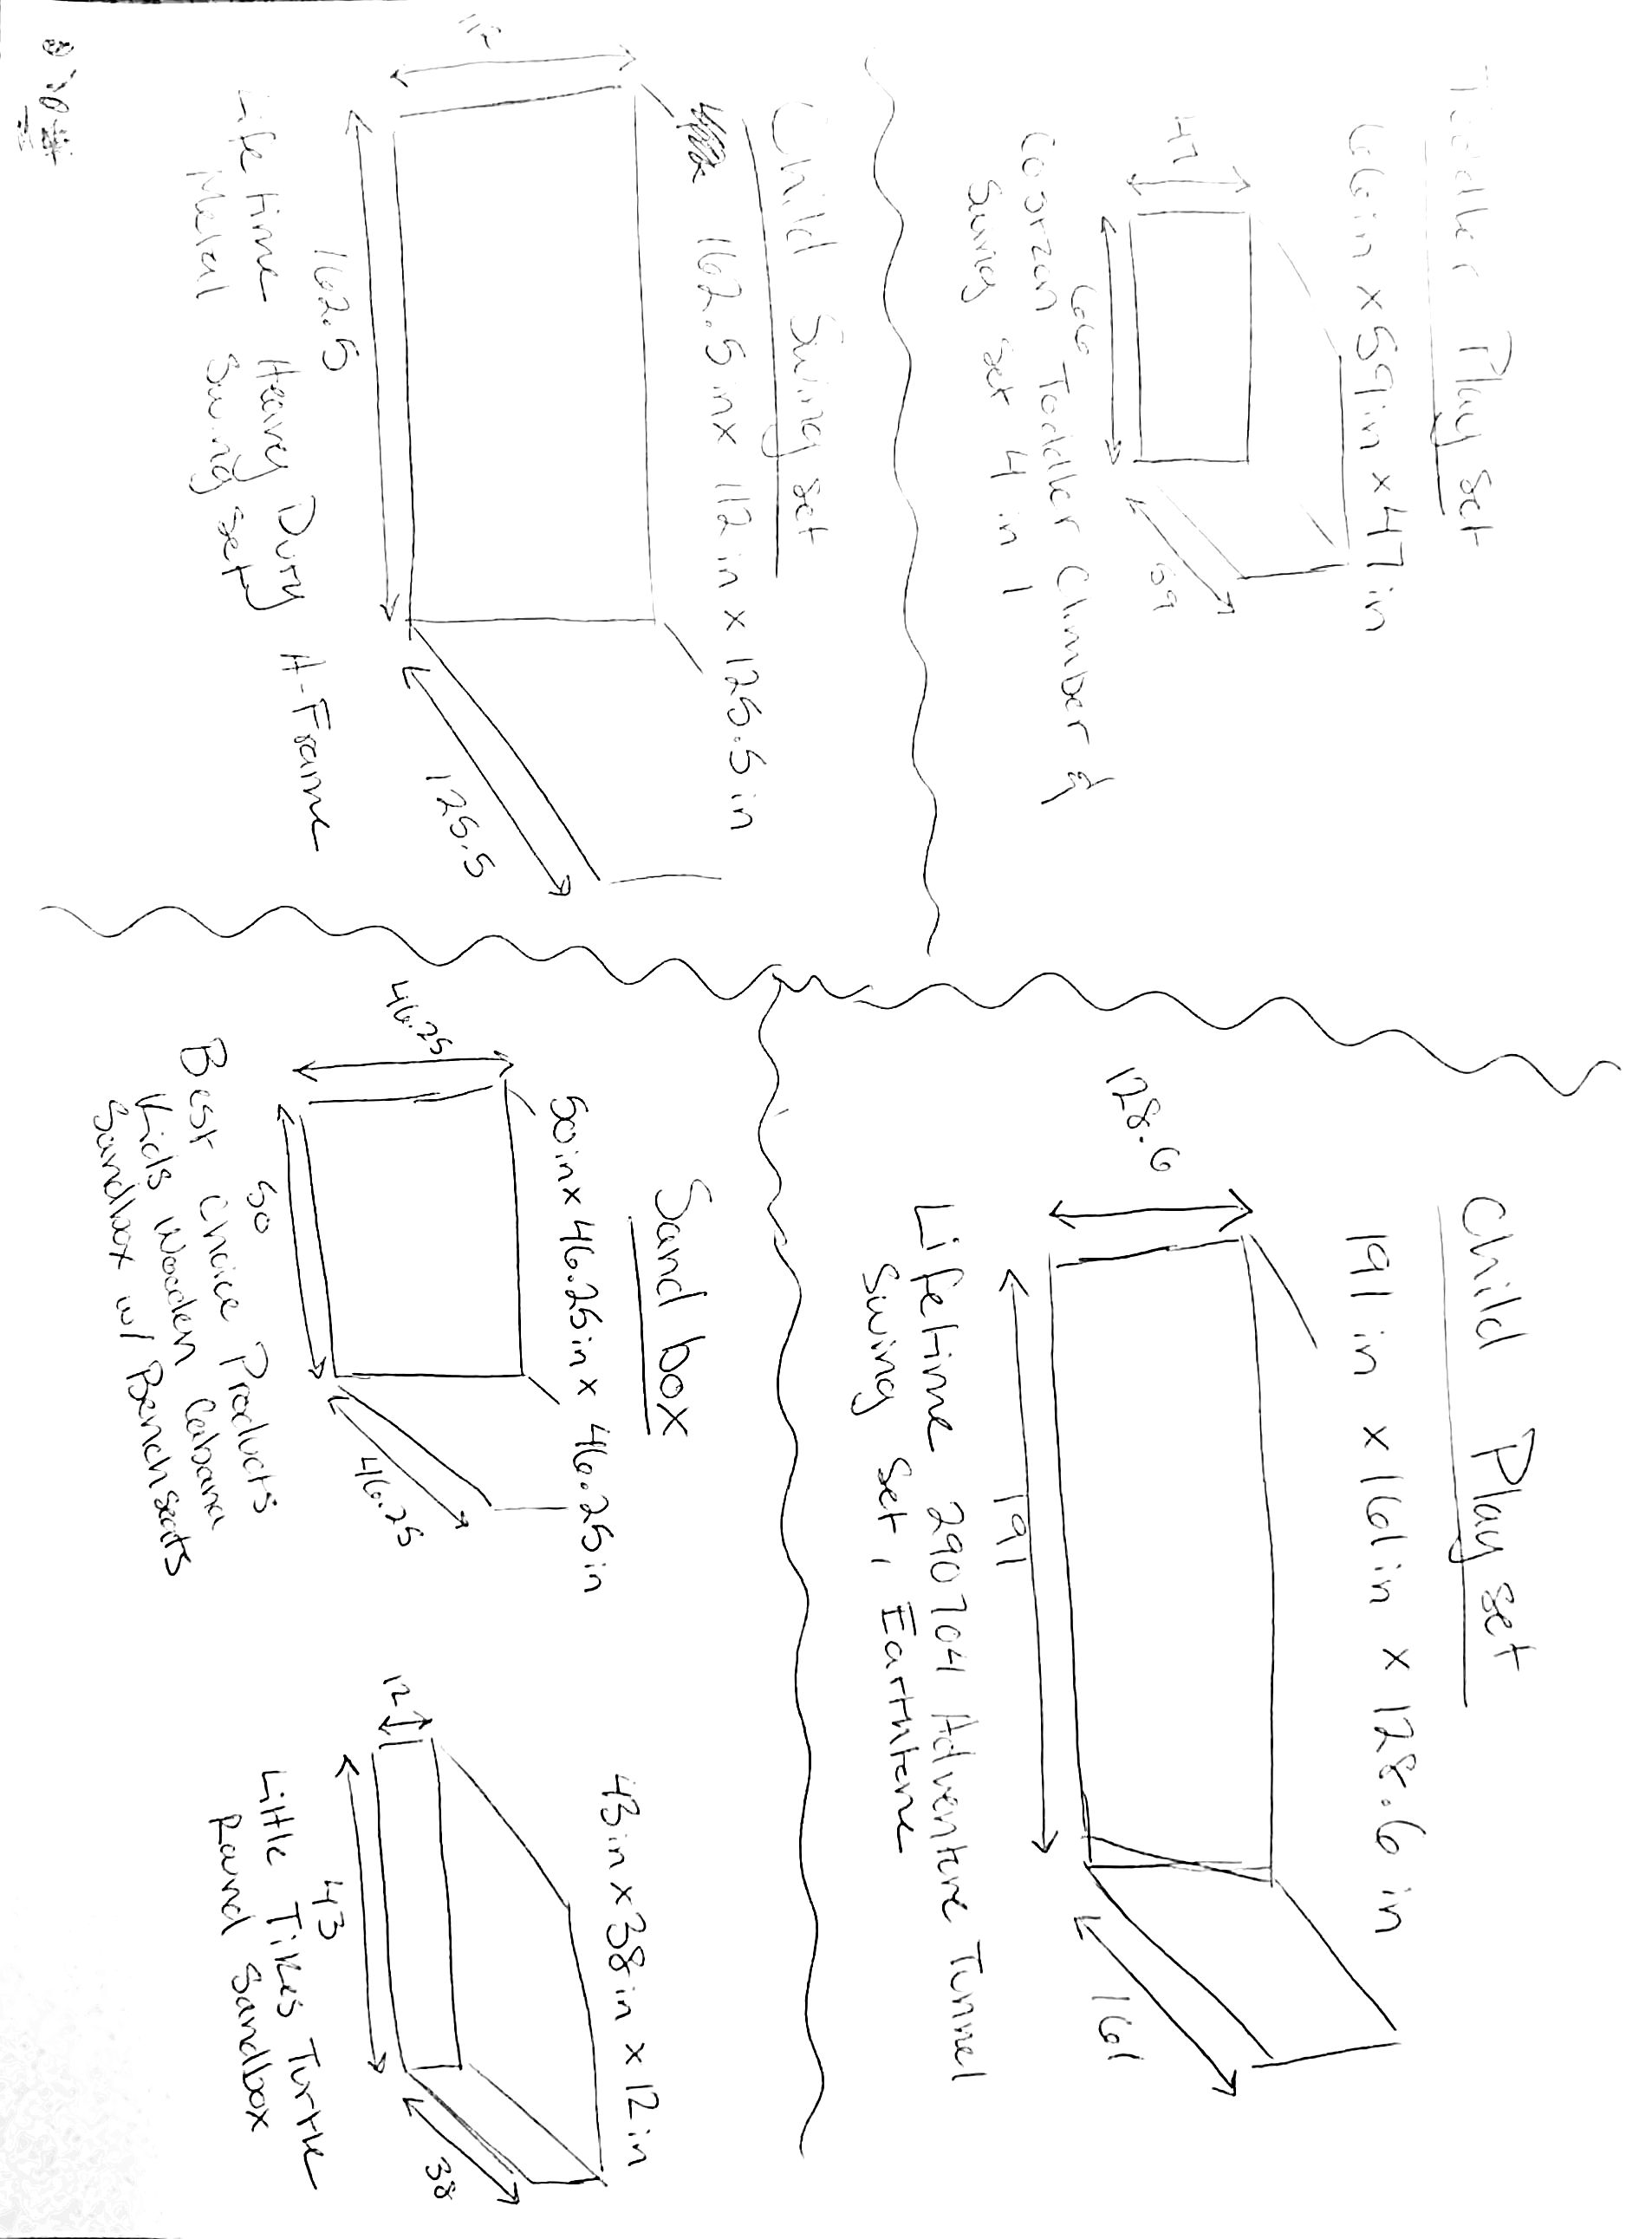
Dimensions of Yard Furniture and Objects
As we were creating our designed we found it helpful to create some mock up of some yard furniture we could put in our design By having our scaled version of our yard and some scaled furniture drawings we could switch things out as we go making it a lot easier to come up with our final design. You may find our mock ups helpful as you design your yard. We have referenced links to all of the outdoor furniture from Amazon at the bottom of this article.
We then started budgeting everything and putting the projects on a timeline. We are still at the start of our plan, but this helped us so we could break the project down into more straightforward honey-do projects. As we continue working on our localscape, We will post related projects and updates below as they get completed.
Adding Pavers (Currently in Progress)
Adding Mulch (Currently in Progress)
Getting Rid of Tree Suckers (Currently in Progress)
Designing your Park Strip. ( I plan to use this park strip design but learned summer is not the best month do to this and will add the blog later in the fall)
Along with my LocalScape Project Here are some Landscaping Project guides Mike has been working on while landscaping his yard for the new home they built.
Overall we hope you found this article helpful. If you need ideas for your Localscape project, check out our landscaping board on Pinterest.
Don’t forget to subscribe to our email newsletter to get access to more content.
Related Articles
Yard Furniture we used when creating our landscape design
